
Let’s say you just got a brand-new, sparkling TV. Like a child at Christmas, you open the box and get ready to enjoy all of its aesthetic splendor. It’s 2025,” you think to yourself. TV technology is booming, and it will always look fantastic. Thus, you plug it in without even checking the default settings. A huge error.
I’ve done it myself. And because it’s generally acknowledged that most customers forget to change the most fundamental settings when configuring their televisions, I’m fine with it. You may have never changed the default settings on your TV, even if it’s a few years old.
You may adjust a few settings on Samsung TVs in particular to enhance your viewing experience and add even more appeal to a dystopian survival thriller. Here are six suggestions to help you do that.
Turn off Brightness Optimization
Go ahead and turn off Brightness Optimization by turning it off as you’ve already reached Power and Energy Saving.
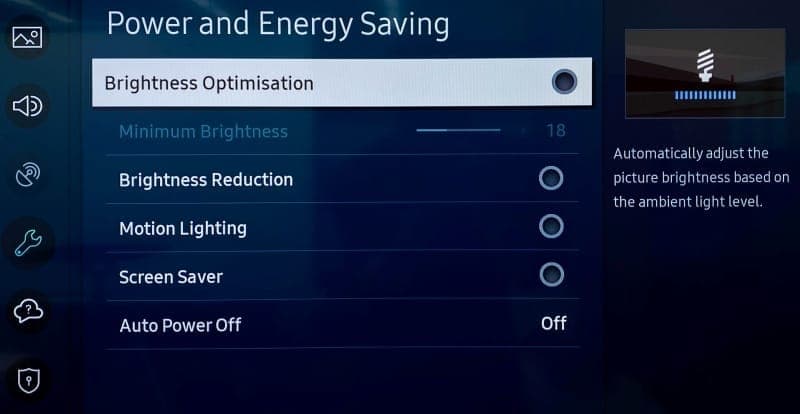
Nowadays, a lot of TVs have optical sensors that can determine the brightness of your room and its potential temperature. The TV then makes adjustments on its own, ostensibly optimizing color temperature and brightness based on that information. This isn’t always accurate, and the feature may end up producing worse results, particularly in a space where lighting conditions can fluctuate, such as on a sunny day when the sky is obscured by large clouds.
Adjust Brightness levels to suit your eyes
The type of content you’re viewing will determine the optimal brightness level. Even if HDR (high dynamic range) is gradually gaining popularity, SDR (standard dynamic range) has been the only option for decades of movies. You can readily change the brightness levels for both situations, though.
Open any software, like Prime, for SDR, but don’t start watching a video just yet. Proceed to All Settings > Picture > Expert Settings > Brightness (keep in mind that this is located under Picture Setup on some Samsung models). Adjust the sliders to determine the SDR brightness sweet spot, in your opinion.
Finding a video that is shown in high dynamic range is the first step in adjusting HDR brightness. Since many of its movies are tagged with brief descriptions identifying their genre, visiting YouTube TV is a quick way to make sure you are watching HDR content. Another option is to just search for “HDR video.”
You will notice a difference when viewing both technologies (SDR/HDR), however the brightness level you select depends on your personal preferences. I think HDR looks its best when the brightness is at its highest. You may discover that SDR appears best at a lower level.
Turn off Motion Smoothing for cinematic viewing
The majority of films are (and have always been) shot at 24 frames per second. Motion smoothing reduces juddering and blur by interpolating images in footage captured at 24 frames per second. Given that live television is filmed at 30 frames per second, this can be useful when watching sports.

However, Motion Smoothing—another popular default feature—has a reputation for giving televisions a “soap opera appearance.” Just from that description, you’ll likely understand. In photographic prints, I conceive of it as glossy versus matte, where glossy refers to the look of a soap opera that mimics a live broadcast. Even though I always strive for an immersive viewing experience, I don’t have to see the actors and crew filming the scene on the set.
Browse to Picture Clarity Settings under All Settings > Picture > Expert Settings.(Note that Motion Smoothing is referred to as Picture Clarity or Auto Motion Plus on Samsung TVs.)
From here, you can select Custom Settings or completely disable Picture Clarity (Motion Smoothing). You may want to increase the Blur Reduction and Judder Reduction sliders there if you’re playing a video game or watching a soccer match. Turning off Motion Smoothing, however, is the best option for traditional (filmic) aesthetics.
Choose a Picture Mode that suits you
The Movie, Cinema, or Filmmaker modes, in my opinion, are typically the best since they seek to offer the most genuine and accurate depiction of the content creator’s vision. These settings also lessen the possibility of introducing artifacts and other problems with image quality by cutting down on superfluous image processing.
Select Picture Mode from the All Settings menu. Then browse between these three selections (Movie, Cinema, or Filmmaker) to find your favorite.
The color temperature is typically cooler or bluer when using the standard mode by default. Vivid mode, which Samsung refers to as Dynamic mode, is frequently included with TVs. Both the Dynamic and Sports modes can make colors appear overly bright, giving the entire image a harsh shine, therefore I would suggest avoiding that. Because the colors will stand out more in storefronts, businesses are more likely to employ these modes when setting up display TVs.
Turn off Eco Mode

Nowadays, almost every TV has some sort of “Eco Mode” on by default. By lowering the contrast and dimming the TV’s brightness, Eco Mode is intended to conserve power. According to a recent research, turning on Eco Mode can reduce your annual electric cost by as low as $7. (That is a daily amount of less than two cents.) There are other ways to more efficiently lower your carbon footprint, therefore it doesn’t make a big difference whether “eco” stands for economics or ecology.
To disable Eco Mode, click the gear button on your Samsung remote to access the settings. Then follow this path: All Settings > General and Privacy > Power and Energy Saving > Energy Saving Solution. Lastly, toggle Energy Saving Solution off.
Check Local Dimming
There are three settings for Local Dimming on Samsung TVs, which is another control that affects brightness levels. Select Local Dimming under All Settings > Picture > Expert Settings.

To find the one that works best for you, try sampling Low, Standard, and High. When Local Dimming is set to Low, bright objects on dark backgrounds see reduced halo and blooming. My favorite setting on Samsung TVs is High since it maintains maximum brightness without haloing surrounding images.
After making changes to Local Dimming, you may wish to go back and evaluate if the brightness levels on both SDR and HDR content are adequate.


Keep Reading
Six days after Android 17’s stable rollout began on June 16, a growing number of Pixel owners are dealing with a touchscreen bug that makes their devices genuinely unreliable. Swipes invert direction, taps either fail to register or fire multiple times, and screens go briefly unresponsive before recovering. Google has confirmed the bug and says […]

Motorola Quick Launch lets users double-tap the back of the phone to trigger a custom action without touching the screen. According to AT&T’s support documentation for the Razr+ 2025, when Quick Launch is enabled, that double-tap can perform actions like taking a screenshot or returning to the home screen. That specific wording — “certain options […]

If a Samsung phone occasionally shows a small flashing dot – or several – on the display, the proximity sensor is almost certainly the cause. These dots typically appear near the top center of the screen and become most visible during phone calls, when the under-display sensor is actively working. It’s worth distinguishing these from […]

Samsung builds the Galaxy Watch on the assumption that most people want some level of health and fitness tracking. That may be true for many users – but even if it describes you, there are several health settings running in the background that you might never actually check. If that data isn’t being used, there’s […]

Portable tech exists on a spectrum. A desktop setup stays home. A laptop travels. A phone handles the street-level stuff. And when even pulling out a phone to skip a song feels like too much effort, a smartwatch steps in. It’s the layer of tech that lives on your wrist, always available without the friction. […]

Before USB-C came along in 2014, smartphones relied on mini USB, micro USB, or Apple’s proprietary Lightning port. Android devices made the switch to USB-C early on — the Nokia N1 tablet was one of the first devices to feature the reversible connector — and Apple eventually followed suit, dropping Lightning with the iPhone 15 […]

Comments & Discussions
Join the conversation! We use Disqus to handle comments. Click the button below to load the comment section.