

We will learn how to create moving pictures on your phone today. It is a wonderful thing to capture a moment. However, what if your ideal image could be animated? What if a static moment in time could have a movement added to it? How awesome would that be? Imagine having a photograph of a waterfall. If the waterfall moved and everything else remained motionless, that would be amazing. Or picture a sunset.
An already stunning composition would get a whole new level if a portion of the image were animated. Use this guide to improve your social media game and produce stunning moving graphics. Show off your editing and photography prowess to your friends.
We will concentrate on only one photo editing app, despite the fact that there are many that allow you to create moving photographs Pixaloop.
Pixaloop is a free app that is available on both the Apple App Store and Google Play. It enables users to create GIF animation effects, live images, and backgrounds.
It uses their cutting-edge photo animator to give static photographs alive. You have a successful app when you combine that with a simple and user-friendly UI. Let us test this application instead of just discussing it.
Pixaloop is available on the Apple App Store and Google Play Store. I will be downloading and installing it from the Play Store because this demonstration is being done on an Android smartphone.

You begin by selecting an image, just like you would with any other image editing program. However, you can also choose to open your camera and take a fresh picture. I let you make that choice. Making moving pictures while on the fly might be entertaining at times. I will be selecting a picture from my collection for the tutorial.

It’s an image I have previously downloaded on my phone.
This is an awesome picture. We are going to be using it to demonstrate how to make moving image using your phone.
When you launch Pixaloop it looks something like this

Your image can be animated in two different ways. You can either import an existing image or take a new one with your phone’s camera. I will bring mine in.
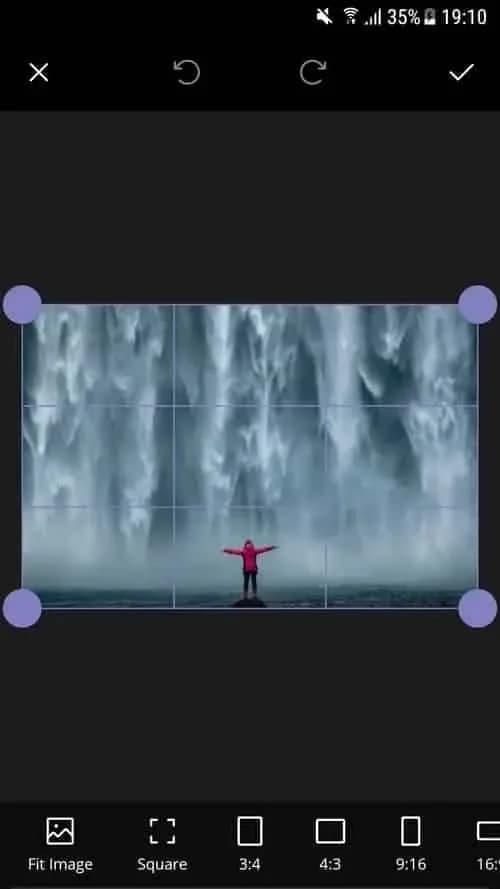
Before applying the motion effect, you can crop the image on the first screen. Cropping your work in advance is a good idea, depending on where you want to publish it.
Personally, I think this works really well. I am not going to perform any cropping. will start working on a motion picture right away.
I see a cascading waterfall in this picture, with the figure motionless. This picture will, in my opinion, take on a completely new level if the background is animated.
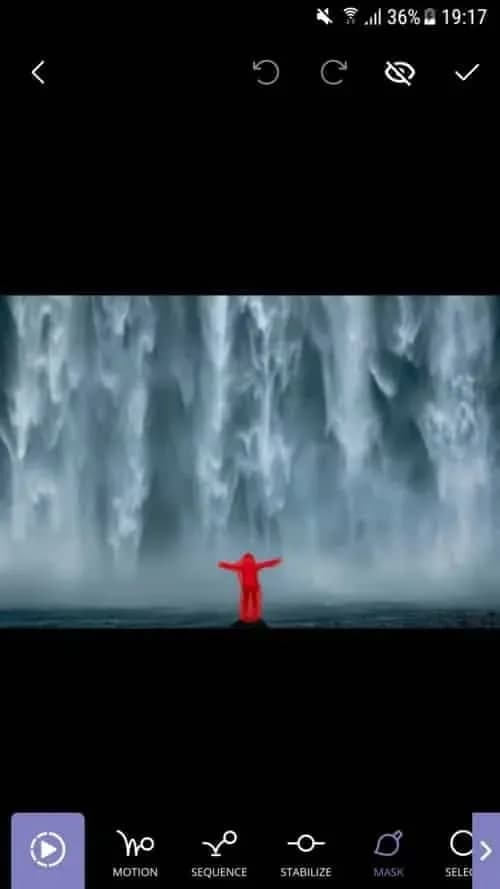
I also carried out my masking technique on the background. At least a portion of it. I do not want the ground to move either. The moving image does not look nice with it. Simply said, it is not natural. Trial and error is how you go about this procedure.
After making your adjustments, hit the Play button. Proceed to the following step if you are satisfied with the outcome. If not, go back and make all the changes you dislike.
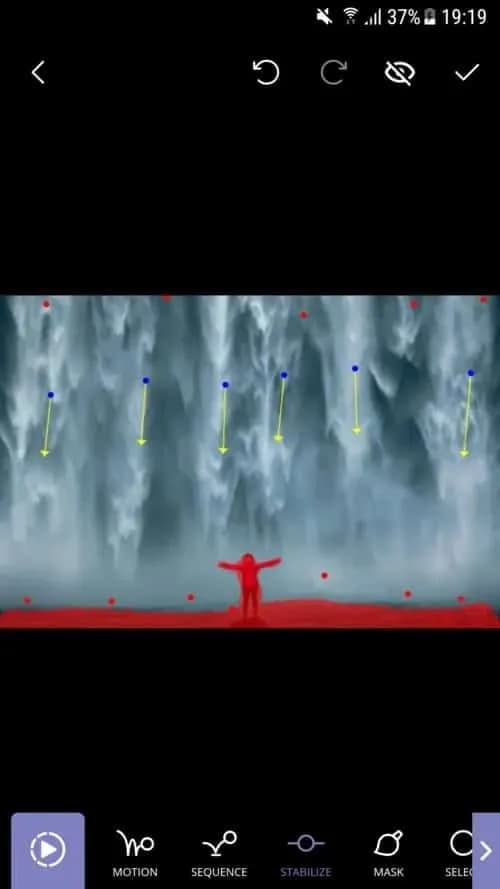
I decided to use Motion Animation for this picture. Clicking the Motion button at the bottom of the screen will activate it. You can specify the animation’s path to the program when this parameter is enabled.
As you can see, I made six pathways, each of which points downhill. I am emulating the course a waterfall would naturally follow.
You can also adjust the waterfall upward if you would like. Using this tool to create a moving image would cause everything to animate in a downward manner. And I mean all of it. I discovered that both the top and bottom are dragged down after playing my clip. I utilized Anchor Points to resolve this problem.
Five anchor points are visible on top of the photograph, and seven anchor points are directly above my ground mask. This keeps the image from moving strangely on the top and bottom. I was happy with the outcome after a few attempts, shifting and adding anchor points.

Google Pixel Watch 5 (45mm)

Cristian Penisoara is a Guides Writer and Android specialist at Droid Tools. An Android user since version 2 and a professional event photographer, he combines technical curiosity with a detail-oriented approach - every guide he publishes is tested step-by-step on a real device before it goes live.

Behind a two-tap recharge sits a surprising amount of plumbing. Every prepaid network has its own rules about what can be topped up, in which denominations, and how quickly credit posts to a SIM. MobileTopUP hides that complexity behind a single form: pick a country, enter a number, choose an amount. What the coverage map actually covers […]

Knowing how to turn off Safe Mode on Android comes in handy, since Safe Mode is a built-in troubleshooting tool that disables every third-party app on a phone and switches on Airplane Mode, making it easier to isolate an app causing lag, battery drain, or other issues. It's also useful for safely deleting a suspected […]
Opening a brand-new phone has a particular excitement. After removing the plastic, you move your pictures, log into your Google account, and begin taking your first snapshot. However, we frequently overlook a few crucial settings that can improve our phone in all that excitement. I looked at a few options on my current phone, a […]

If your Android phone won’t turn on, connect it to a tested wall charger for at least 30 minutes, then hold the Power button for several seconds. If nothing happens, inspect the cable, adapter, outlet, charging port, and physical buttons before attempting a forced restart. A phone that appears completely dead may actually have a […]
The next story loads as you reach the end. You can also load it using the button.


Comments & Discussions
Join the conversation! We use Disqus to handle comments. Click the button below to load the comment section.