The days of rooting your device or looking for third-party apps to record your screen on Android devices are long gone. The majority of modern smartphones with Android 11 and later have an integrated screen recorder.
Convenience, more privacy, and enhanced performance are provided by this native feature. Whether you are recording a livestream, creating a tutorial, or recording a game session, this guide will show you how to make the most of Android’s built-in screen recorder.
Why screen recording matters
For many Android users, the ability to record screen has become indispensable. Content producers frequently have to capture mobile gaming, app evaluations, and walkthroughs. Professionals might have to show colleagues how to use bugs or make quick educational videos. When recording video chats, social media stories, or instructions for assisting friends in troubleshooting a phone problem, this tool might be useful even for novice users.
Users had to rely on apps from the Play Store prior to Android having this feature built in; many of these apps had restricted functionality, data tracking, advertisements, or required a subscription. Native tools now provide a smoother, safer, and ad-free experience.
Check if your device supports native screen recording
Android 11 and later versions support the built-in screen recording feature. Open the Settings app, navigate to “About phone,” and locate the Android version section to verify your Android version. You can move forward if your device is running version 11 or later.
It is also important to note that almost every major brand has this capability in their operating systems, including Google, Samsung, OnePlus, Xiaomi, Realme, and Motorola. However, each manufacturer may have somewhat different interfaces and extra options.
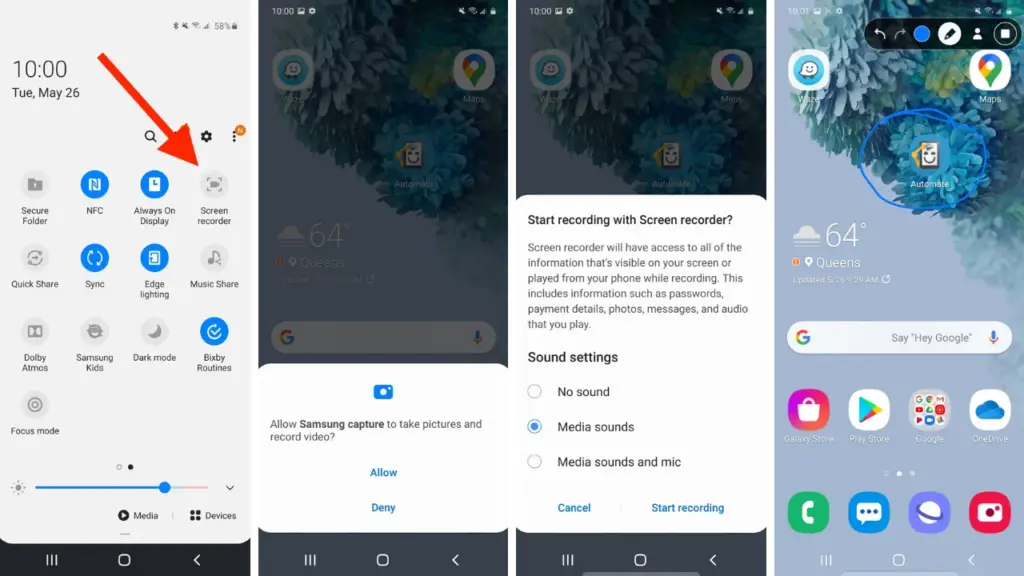
How to start screen recording on Android
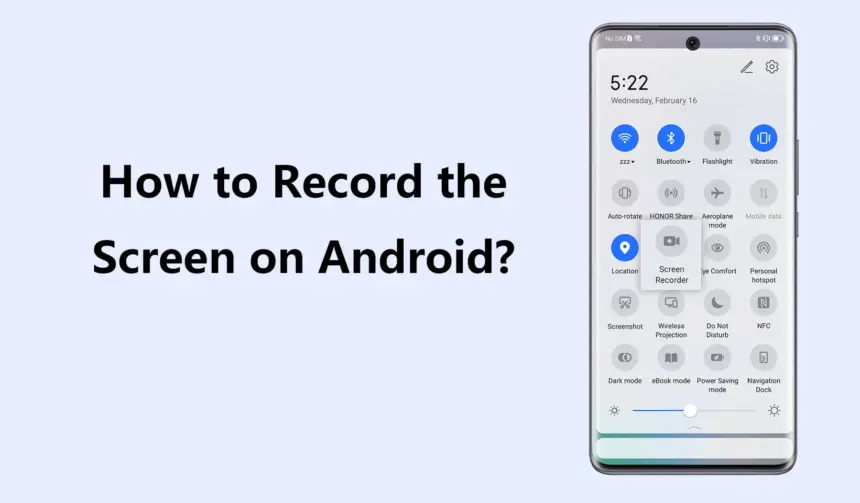
Swipe down from the top of your screen to see the Quick Settings panel, then activate the screen recorder. To fully enlarge the panel, swipe down once more. Next, search for a tile that says “Screen record” or “Screen recorder” If it does not appear right away, you can add the screen recording option and reorder your Quick Settings tiles by tapping the pencil or “Edit” symbol.
When you tap the tile, a dialog will pop up offering a few choices before recording begins. You can choose whether to:
- Record audio from the microphone, internal device audio, or both
- Show visual touches on the screen during the recording
Depending on your recording requirements, these choices can be helpful. For example, you could want to use the microphone when narrating a tutorial. Internal sound may be better suitable if you are recording gaming or app audio. Once your choices have been set, press “Start” and watch for the three-second countdown. After that, your recording will start.
A tiny toolbar or red symbol will show that the screen is being recorded during the recording. Pull down the notification shade and press the stop button when you are done. Your device’s storage will automatically store your video.
How screen recording differs by device brand
Each Android manufacturer may offer a slightly different version of the screen recorder:
- Samsung (One UI): One of the most feature-rich native recorders is offered by Samsung. You can record your face with the front camera, record internal audio, and choose from a variety of video quality options. During the recording, you can even draw on the screen, which is a terrific way to graphically explain topics.
- Google Pixel: Pixel phones running Android 11+ have a clean, minimal screen recorder built into Quick Settings. It’s simple to use but doesn’t offer the same advanced features as Samsung’s version.
- Xiaomi and Redmi (MIUI): These devices often include a standalone “Screen Recorder” app, which can be found in the Tools folder. It allows you to configure video resolution, frame rate, sound source, and orientation. Recordings are saved in an organized, dedicated folder.
- OnePlus (OxygenOS): Native screen recording is available from OnePlus as early as Android 10. It has settings to set bit rates and frame rates, record system sounds, and display touches. The user interface is clear and simple to use.
- Realme and Oppo: These brands also offer native recording tools similar to Xiaomi, with a balance of customizability and ease of use.
These slight differences can impact your experience, so it’s useful to explore your device’s specific implementation for the best results.
Where screen recordings are saved
Once you finish recording, the saved video can typically be found in your phone’s internal storage under:
- Internal Storage > Movies > Screen recordings
- Internal Storage > DCIM > Screen recordings
Also, screen recordings are typically shown in a distinct folder or album called “Screen recordings” in your normal gallery software (like Google Photos or Samsung Gallery). Use a file manager tool and search for recently edited MP4 files if you are having problems finding your file.
This consistent file structure helps you quickly retrieve, share, or edit your recordings.
Tips for better screen recording results
Here are some suggestions to improve the quality and usability of your recordings:
- Use Do Not Disturb mode: This prevents interruptions from calls, texts, or notifications while recording.
- Close unnecessary apps: Reducing background processes ensures smoother performance and fewer lags during recording.
- Enable touch indicators: If you’re creating tutorials, visual touches help viewers understand where you’re interacting on the screen.
- Choose appropriate resolution and frame rate: Higher settings give better quality but consume more storage space. For gameplay, use 1080p at 60fps if available.
- Record with adequate lighting and contrast: If you’re recording apps or system settings, avoid dark themes that make the video harder to see.
Limitations and common issues
While native screen recorders are generally reliable, there are a few caveats:
- DRM-protected content: Apps like Netflix or some banking services block screen recording to protect sensitive or copyrighted material. In such cases, you’ll see a black screen or an error message.
- Lack of internal audio on some devices: Not all Android phones allow internal audio recording due to manufacturer restrictions or legal considerations. Some devices default to microphone-only input.
- Storage limitations: Long screen recordings take up a lot of space. Ensure you have enough free storage to avoid failed recordings or low-quality output.
In rare cases, the screen recorder might not appear in the Quick Settings panel. This can usually be fixed by updating your software or resetting the tile arrangement in settings.
The screen recording feature built into Android is a game-changer for productivity, communication, and content creation. Whether you’re capturing a quick how-to for a family member, recording an epic moment in a mobile game, or documenting a tech issue for support, the ability to do it all without third-party apps makes the process simple and secure.
As long as your device runs Android 11 or higher, you already have this powerful tool at your fingertips. With a few simple settings and some creative uses, you’ll be able to record anything on your screen with clarity and ease – no installations required.


