Android device repair prep (stress-free) – the power guide to protect your data

Your android device is going in for service or repair, and yeah… it’s easy to tell yourself, “It’s just a screen replacement, what could happen?” Then you remember: your phone is basically your pocket brain. Photos, notes, bank apps, work chats, that one folder you never show anyone—everything.
So let’s do this properly.
This guide is a practical, no-drama checklist to prepare your android device before you hand it to a technician. Not the paranoid kind of prep. The smart kind. The kind that prevents data loss, protects your privacy, and makes the repair process smoother.
Secondary keywords used naturally: Android backup, factory reset, phone repair checklist, protect personal data, Google account removal, SIM card and SD card, Find My Device.
The “Quick Outline” (Internal, For Flow)
You’ll go through:
- Why prep matters (even with trustworthy shops)
- Backup (cloud + local)
- Remove SIM/SD and sensitive access
- Decide on factory reset (and when not to)
- Document your issue like a grown-up (so repairs go faster)
- Privacy + security settings that actually matter
- What to do at drop-off and pickup
- Common mistakes and a simple final checklist
Why Preparing an Android Device Before Repair Matters (More Than You Think)
Here’s the uncomfortable truth: even honest repair shops can cause data loss.
Not because they’re evil. Because diagnosing problems often involves resets, firmware updates, battery disconnects, or tests that can corrupt storage. And if your android device is acting weird already (boot loops, overheating, random restarts), the risk of “it died during testing” is real.
Also, there’s privacy. Most technicians don’t care about your personal life. But your phone is still unlocked data sitting in someone else’s hands. It’s like leaving your house keys on the counter and hoping nobody opens the wrong door.
You don’t need to be anxious. You just need a process.
Step 1: Back Up Your Android Device (Cloud First, Local Second)
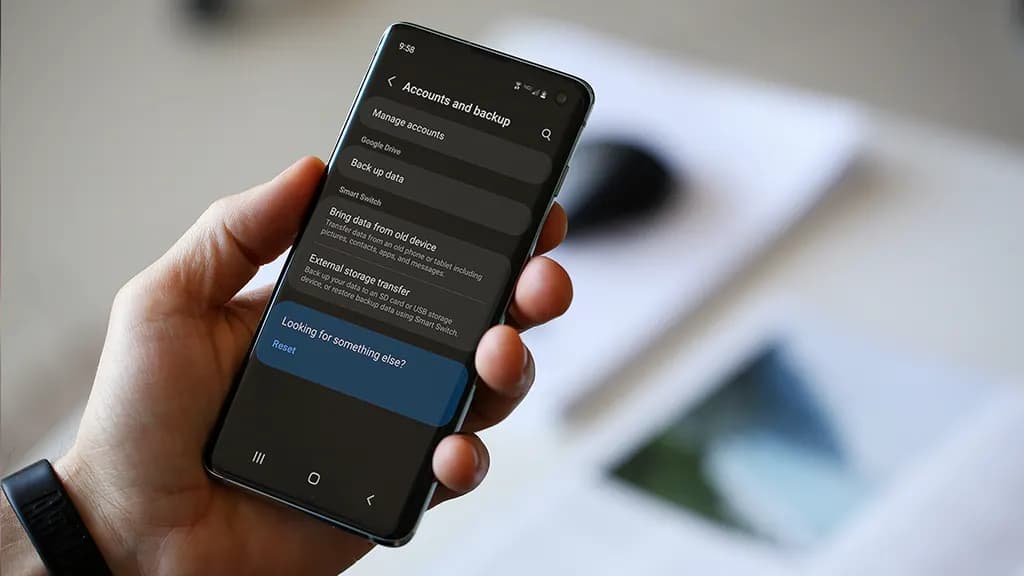
If you only do one thing, do this.
Use Google Backup (Fast and Built-In)
On most phones:
- Settings → Google → Backup
or - Settings → System → Backup
Turn it on and let it run. Then check the backup timestamp. Don’t assume it worked “at some point.”
What it usually covers:
- App list and some app data
- Call history
- Contacts (often via Google Contacts sync)
- Device settings
- SMS/MMS (on many devices)
But – small contradiction – Google backup is both great and not enough. It’s reliable for basics, but it’s not a perfect clone of your phone.
Back Up Photos and Videos
If you use Google Photos:
- Open Google Photos → profile icon → Photos settings → Backup
Then scroll your gallery and confirm recent photos actually uploaded. People think they’re backed up… until they aren’t.
Make a Local Copy (Because Clouds Have Limits)
Plug your android device into a laptop/PC:
- Select “File Transfer” (MTP)
- Copy these folders:
- DCIM (camera photos/videos)
- Pictures
- Download
- Documents
- WhatsApp/Telegram media folders (if you use them heavily)
If you don’t have a PC, use:
- An external USB drive with an OTG adapter
- A microSD card (if your phone supports it)
Local backup feels old-school. But it’s the “seatbelt” you’ll appreciate if the cloud fails.
[img here – alt: android device backup before service]
Don’t Forget Two “Annoying” Things
These are the ones that hurt most when they’re gone:
- Notes (Google Keep / Samsung Notes / third-party apps)
- Authenticators (2FA apps)
For authenticator apps, check inside the app for export/transfer options before your device gets wiped. Otherwise you might lock yourself out of accounts. Not fun.
Step 2: Remove SIM Card and SD Card (Small Action, Big Protection)
This part is quick and oddly satisfying.
- Remove the SIM card (your number and carrier access)
- Remove the SD card (your personal files and media)
Even if the repair shop is trustworthy, SIM/SD cards can be misplaced. They’re tiny. Things happen.
Also, if your SD card has photos—don’t leave it in the phone. Just don’t.
Step 3: Decide If You Should Factory Reset the Android Device

This is where people get stuck.
When a Factory Reset Makes Sense
A factory reset is smart when:
- The repair is software-related (crashes, freezing, weird bugs)
- You’re shipping the phone to a service center
- You don’t want anyone to access anything—even by accident
- You’re okay with restoring everything later
Path usually looks like:
- Settings → System → Reset options → Erase all data (factory reset)
When You Shouldn’t Reset Yet
Don’t reset if:
- You need to show the issue (random reboots, screen glitch, camera error)
- The repair center asks you not to (rare, but possible)
- You rely on on-device data that you can’t back up properly
Here’s the clarification: privacy matters, but so does diagnosis. If the technician can’t reproduce the issue, you might get the dreaded “no fault found” result. So sometimes you keep the data… but you lock it down.
Step 4: Lock Down Access (Without Making the Repair Impossible)
If you’re not factory resetting, this part is essential.
Use a Strong Lock Screen
Set a PIN (not 0000, please).
Disable “Smart Lock” features that keep the phone unlocked at home or near a watch.
Pause or Remove Highly Sensitive Apps
For apps like:
- Banking
- Crypto wallets
- Password managers
At minimum:
- Sign out
- Remove biometric login
- Consider uninstalling temporarily (after backup)
Technicians don’t need that access to replace a screen.
Keep “Find My Device” Enabled (Usually)
If the phone is lost during transit or at a large facility, Find My Device can help locate it. Just make sure you remember your Google login.
Step 5: Write a Simple Repair Note (This Speeds Everything Up)
A good repair note is like giving the mechanic a clean description of the engine noise.
Create a note (or email) with:
- Phone model (e.g., “Samsung Galaxy A54”)
- Android version (Settings → About phone)
- What’s wrong (specific symptoms)
- When it happens (after charging? after updates? only on Wi‑Fi?)
- What you already tried (restart, safe mode, clearing cache, uninstalling an app)
Example (copy style, not text):
- “Screen goes black during calls, but touch still works. Happens 3–4 times/day. Started after last system update. Restart fixes temporarily.”
That’s gold for technicians.
Step 6: Clean Up “Embarrassing” Stuff (No Shame, Just Practical)
This isn’t about being dramatic. It’s about comfort.
Before service:
- Close private tabs in your browser
- Remove sensitive photos from the main gallery (move to a secure folder or cloud)
- Turn off notification previews on lock screen
Even if your phone stays locked, notifications can reveal a lot.
[img here – alt: android device privacy before repair]
Step 7: At Drop-Off—Ask the Right Questions (Politely)
A simple script:
- “Will you need my unlock code?”
- “Is a factory reset likely?”
- “Do you keep devices overnight, and how are they stored?”
- “Can you note the condition (scratches/dents) on the intake form?”
Also: take quick photos of your phone from all angles before you hand it over. It’s not accusatory. It’s just smart.
Step 8: After Repair—Test Before You Leave
Don’t rush out. Do a 2-minute test:
- Screen touch everywhere
- Charging port
- Speaker and mic (quick voice recording)
- Camera front/back
- Wi‑Fi and Bluetooth
- Fingerprint sensor (if you use it)
If anything feels off, say it immediately. Fixes are easier on the spot.
Common Mistakes People Make (So You Don’t)
- Backing up “later” (and then forgetting)
- Assuming Google Photos uploaded everything
- Leaving the SIM/SD in the phone
- Handing over a phone with banking apps logged in
- Not writing down the symptoms (leading to “we can’t reproduce it”)
- Forgetting 2FA authenticator migration
- Not taking photos of device condition before drop-off
The Final Checklist (Print This Mentally)
Before service or repair:
- Backup complete (cloud + local copy)
- Photos verified in cloud
- 2FA/authenticator transferred or backed up
- SIM removed
- SD card removed
- Banking/password apps logged out or removed
- Strong lock screen enabled (or factory reset done)
- Repair note written (symptoms + model + what you tried)
- Photos taken of device condition
That’s it. That’s the whole play.

Google Pixel 9


Keep Reading
Six days after Android 17’s stable rollout began on June 16, a growing number of Pixel owners are dealing with a touchscreen bug that makes their devices genuinely unreliable. Swipes invert direction, taps either fail to register or fire multiple times, and screens go briefly unresponsive before recovering. Google has confirmed the bug and says […]

Motorola Quick Launch lets users double-tap the back of the phone to trigger a custom action without touching the screen. According to AT&T’s support documentation for the Razr+ 2025, when Quick Launch is enabled, that double-tap can perform actions like taking a screenshot or returning to the home screen. That specific wording — “certain options […]

If a Samsung phone occasionally shows a small flashing dot – or several – on the display, the proximity sensor is almost certainly the cause. These dots typically appear near the top center of the screen and become most visible during phone calls, when the under-display sensor is actively working. It’s worth distinguishing these from […]

Samsung builds the Galaxy Watch on the assumption that most people want some level of health and fitness tracking. That may be true for many users – but even if it describes you, there are several health settings running in the background that you might never actually check. If that data isn’t being used, there’s […]

Portable tech exists on a spectrum. A desktop setup stays home. A laptop travels. A phone handles the street-level stuff. And when even pulling out a phone to skip a song feels like too much effort, a smartwatch steps in. It’s the layer of tech that lives on your wrist, always available without the friction. […]

Before USB-C came along in 2014, smartphones relied on mini USB, micro USB, or Apple’s proprietary Lightning port. Android devices made the switch to USB-C early on — the Nokia N1 tablet was one of the first devices to feature the reversible connector — and Apple eventually followed suit, dropping Lightning with the iPhone 15 […]

Comments & Discussions
Join the conversation! We use Disqus to handle comments. Click the button below to load the comment section.